PFSENSE-FW01
PFSENSE-FW01 is the primary security gateway for the lab. It sits between DMZ_NET and LAN_NET, enforcing inter-zone firewall policies and providing DHCP services to LAN_NET clients.
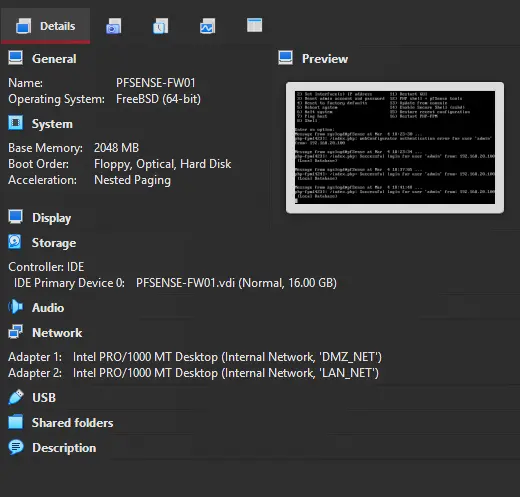
VM Hardware Configuration
| Feature | Configuration |
|---|---|
| OS | pfSense (FreeBSD) |
| RAM | 2 GB |
| vCPU | 1 Core |
| Disk | 16 GB |
| NIC 1 | DMZ_NET (Internal Network) |
| NIC 2 | LAN_NET (Internal Network) |
Installation
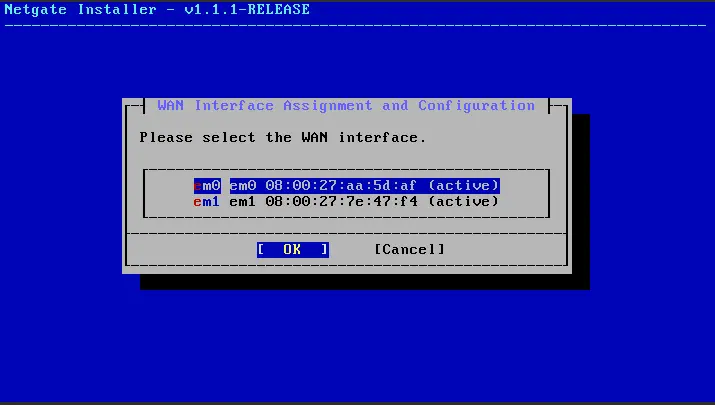
WAN Interface Assignment
The installation wizard prompts for WAN interface selection. Match the MAC address shown
in the wizard against the NIC intended for the WAN-facing segment. In this lab, em0
corresponds to the DMZ-facing NIC and is selected as WAN.
WAN Network Mode Configuration
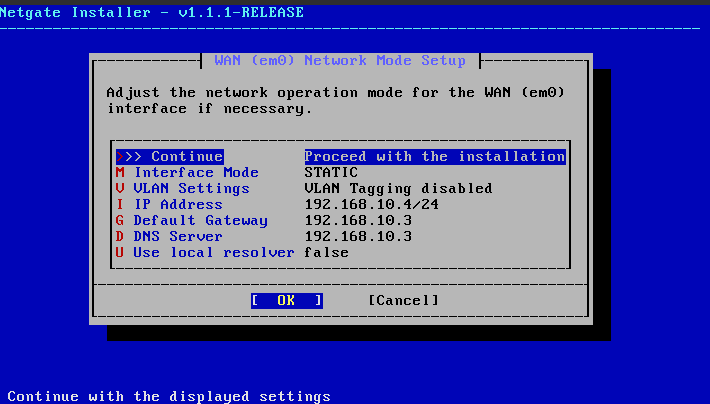
The wizard then prompts for the WAN network operation mode. The default is DHCP, which is not suitable here as EDGE-RTR01 does not provide DHCP services on DMZ_NET. Static addressing is required.
| Setting | Value |
|---|---|
| Interface Mode | Static |
| VLAN Tagging | Disabled |
| IP Address | 192.168.10.4/24 |
| Default Gateway | 192.168.10.3 |
| DNS Server | 192.168.10.3 |
LAN Interface Assignment
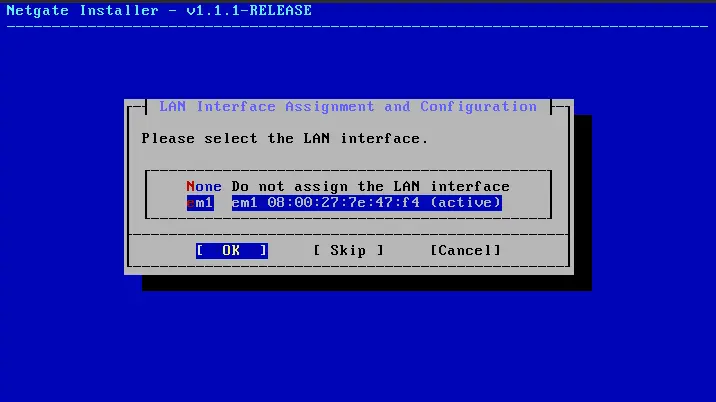
The wizard prompts for LAN interface selection. Since PFSENSE-FW01 has only two NICs,
em1 is the only remaining option and is automatically selected as LAN.
LAN Network Mode Configuration
| Setting | Value |
|---|---|
| Interface Mode | Static |
| VLAN Tagging | Disabled |
| IP Address | 192.168.20.1/24 |
| DHCPD Enabled | Yes |
| DHCPD Range Start | 192.168.20.100 |
| DHCPD Range End | 192.168.20.199 |
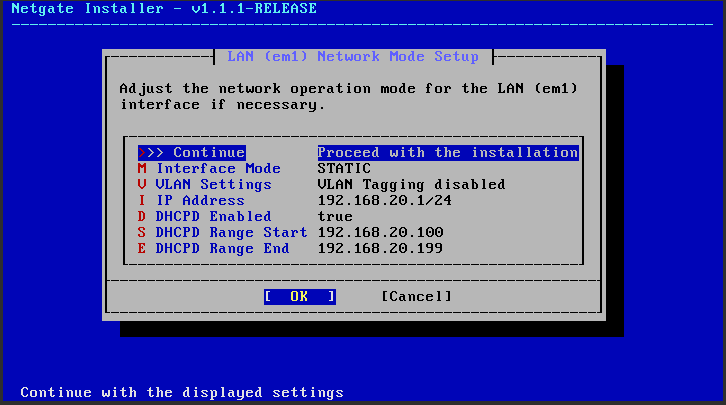
[!NOTE] The DHCP range begins at
192.168.20.100to reserve192.168.20.1–192.168.20.99for statically assigned devices. Assets such as DC01 require a fixed IP address and must fall outside the dynamic range.
This concludes the pfSense installation wizard.
Web-Based Setup Wizard
After the installation wizard, the web-based setup wizard must be completed at https://192.168.20.1.
Since DC01 has not yet been provisioned, ATTACKER01 is temporarily connected to LAN_NET to access the pfSense web UI. Configuring this connection follows the similar steps as establishing ATTACKER01’s WAN_NET connection — refer to ATTACKER01 for those steps and adjust them for LAN_NET.
[!NOTE] The configuration below was completed prior to DC01 being provisioned. Fields such as the firewall domain name and NTP server hostname are left as placeholders and will be updated once Active Directory is established.
Welcome & Support Registration
The wizard opens with a welcome screen followed by a Netgate support registration page. Both are skipped.
General Information
| Setting | Value |
|---|---|
| Hostname | PFSENSE-FW01 |
| Domain | mylab.home.arpa |
| Primary DNS Server | 192.168.10.3 |
| Secondary DNS Server | — |
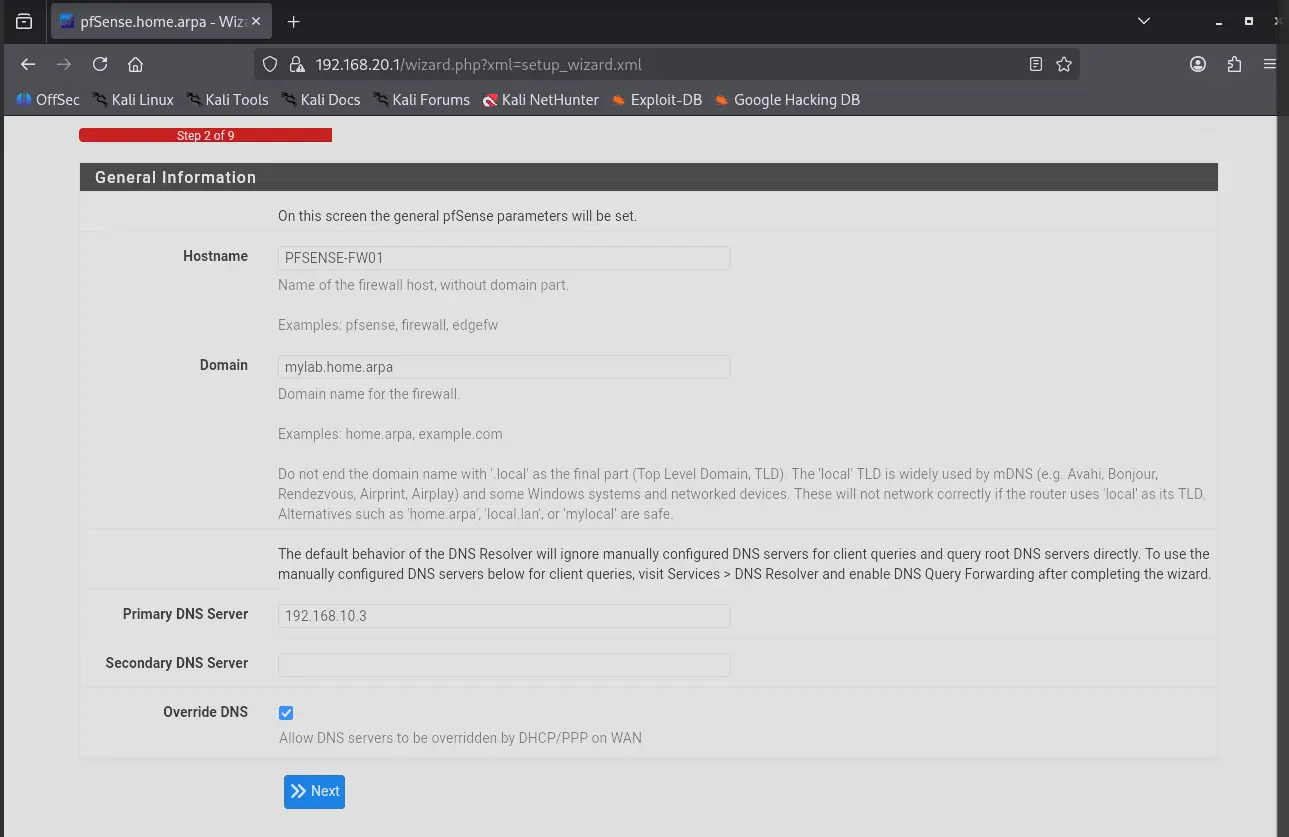
[!NOTE] The domain is left as a placeholder and will be updated to
pfsense.lab.internalonce DC01 is provisioned. The Primary DNS Server is set to EDGE-RTR01 (192.168.10.3) as this field defines the DNS server used for pfSense’s own operations — package updates, NTP lookups, etc. — not the DNS handed out to LAN clients. DC01 will be configured as the LAN client DNS server separately in the DHCP server settings.
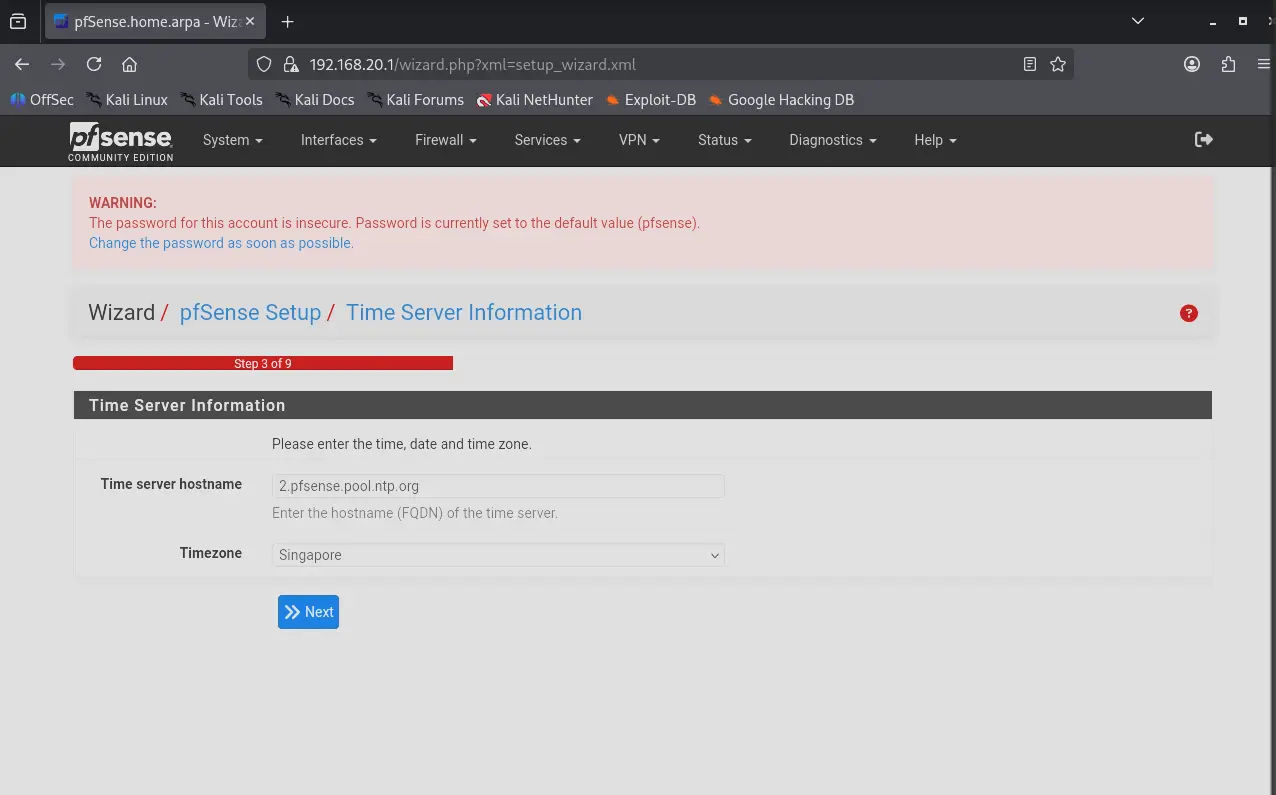
Time Server
The NTP hostname is left as default. The timezone is set to Asia/Singapore. DC01 will be configured as the authoritative time source in a later phase.
WAN Interface
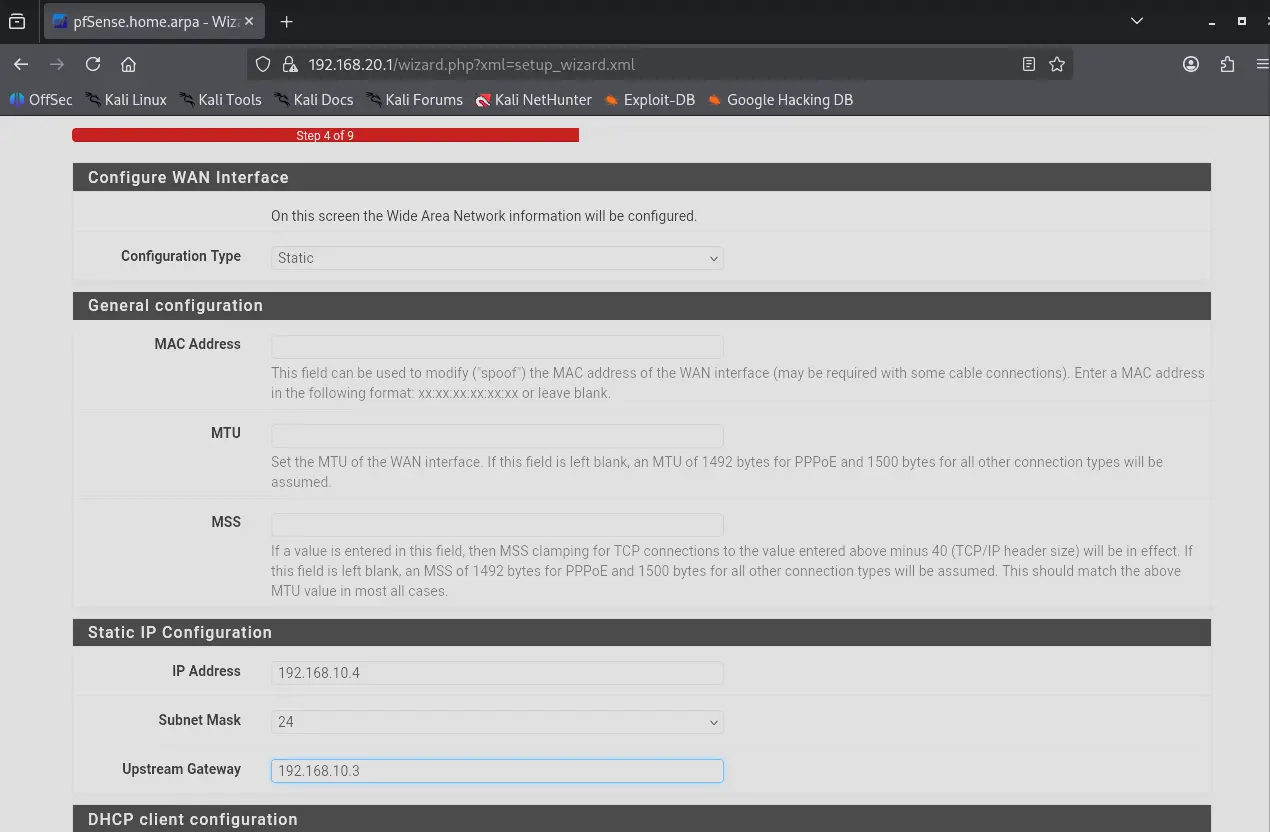
The WAN interface settings are pre-populated from the installation wizard. Values are reviewed and confirmed with no changes required.
LAN Interface
The LAN interface settings are pre-populated from the installation wizard. Values are reviewed and confirmed with no changes required.
Admin Password
The admin password is set to P@ssw0rd123.
Reload & Complete
pfSense reloads to apply all configurations. The setup wizard is complete.
Further Configuration After DC01
Now that DC01 is provisioned, all endpoints in LAN_NET must use DC01 as their DNS server. DNS queries that DC01 cannot resolve locally should be forwarded to pfSense, which then forwards them upstream to EDGE-RTR01.
This requires changes to pfSense’s DNS and DHCP configuration.
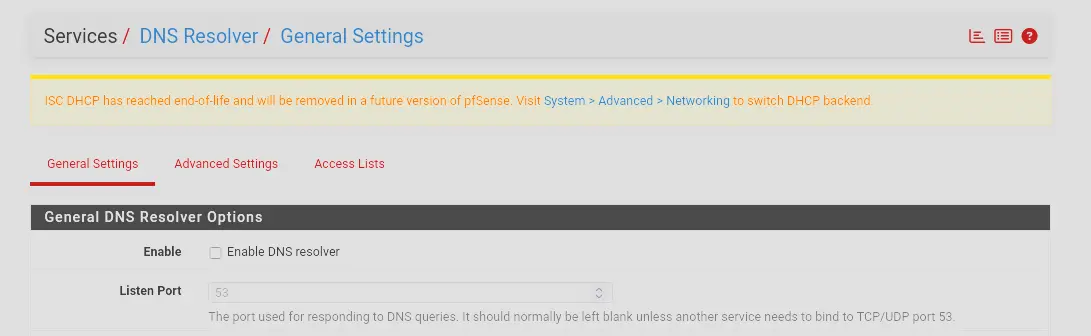
Disable DNS Resolver
The DNS Resolver causes pfSense to act as a full recursive DNS server — it resolves everything itself, ignores the DHCP DNS setting, and assigns its own LAN IP (192.168.20.1) as the DNS server in every DHCP lease granted to endpoints. This must be disabled.
- Navigate to the pfSense web interface at
https://192.168.20.1 - Go to Services → DNS Resolver
- Uncheck Enable DNS Resolver → Save
Set DC01 as the DHCP DNS Server
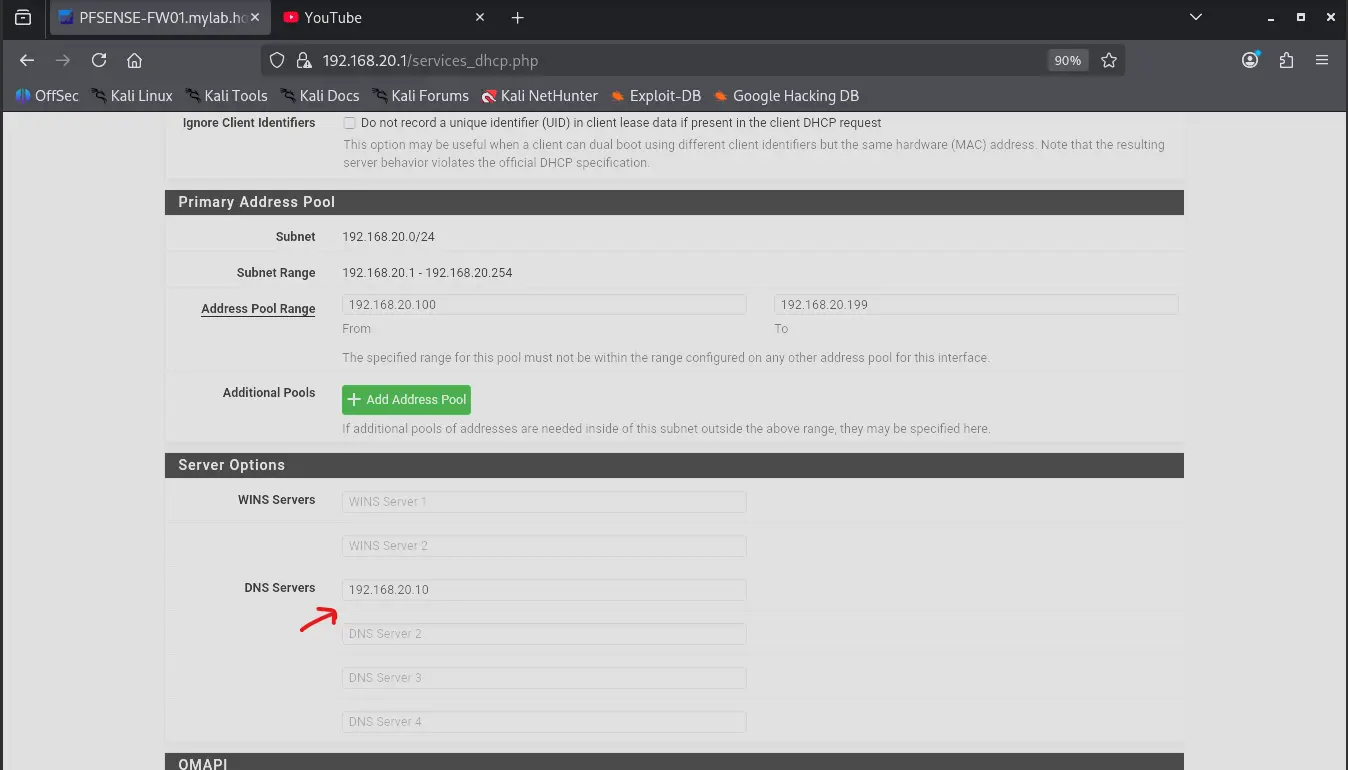
With the DNS Resolver disabled, configure the DHCP server to hand out DC01’s IP as the DNS server for all LAN clients.
- Go to Services → DHCP Server → LAN
- Under DNS Servers, set the first entry to
192.168.20.10 - Edit the Domain Name under Other DHCP options to be
lab.internal - Save and Apply Changes

Enable DNS Forwarder
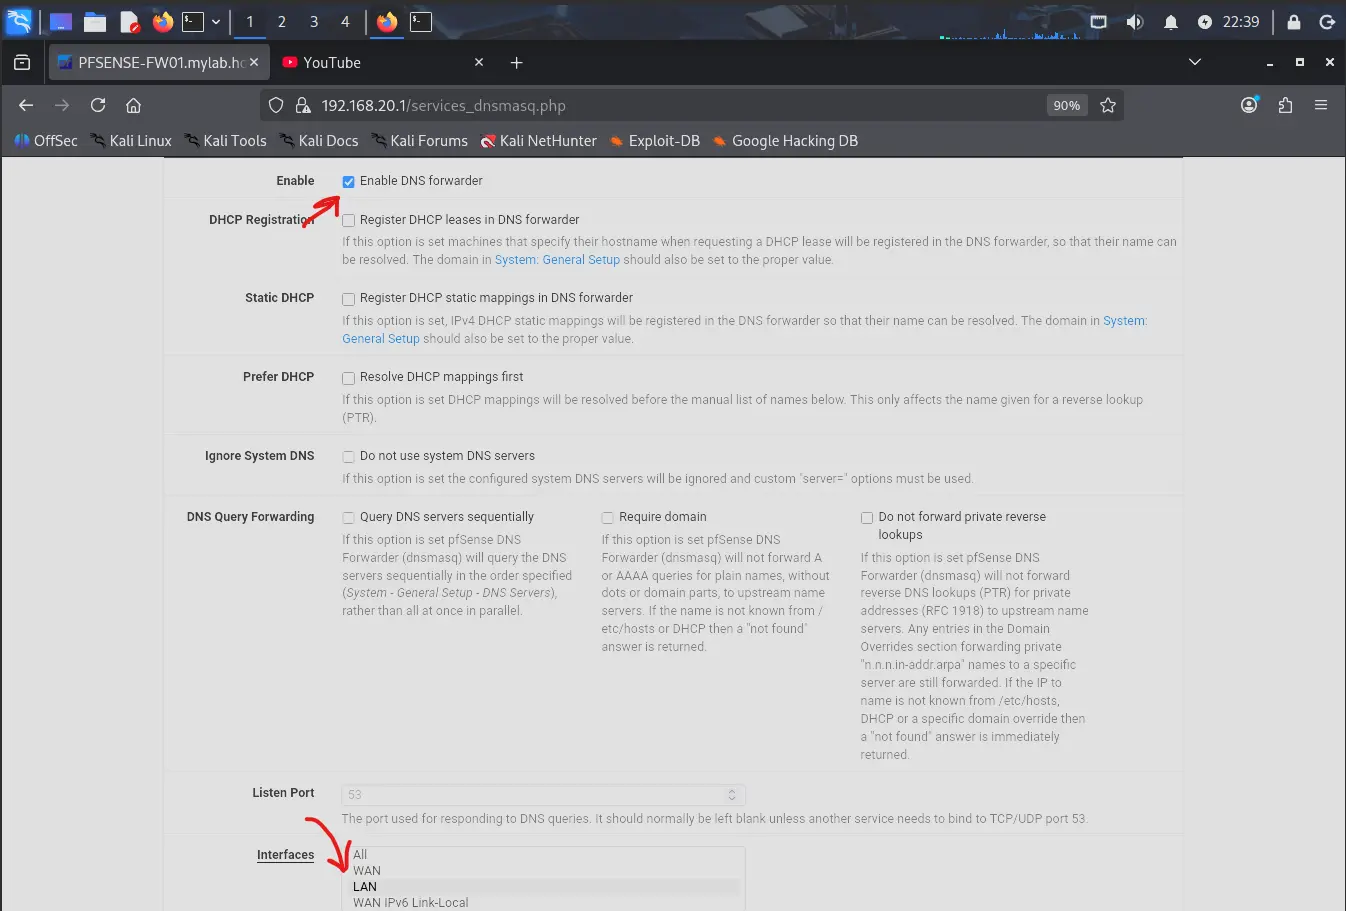
The DNS Forwarder replaces the DNS Resolver as a lightweight pass-through service. Rather than resolving queries itself, it simply forwards them upstream to EDGE-RTR01. Notably, pfSense uses dnsmasq under the hood for this — the same tool configured on EDGE-RTR01.
- Go to Services → DNS Forwarder
- Check Enable DNS Forwarder
- Under Interfaces, select LAN only — there is no reason to listen on the WAN interface
- Save
Update Domain Name
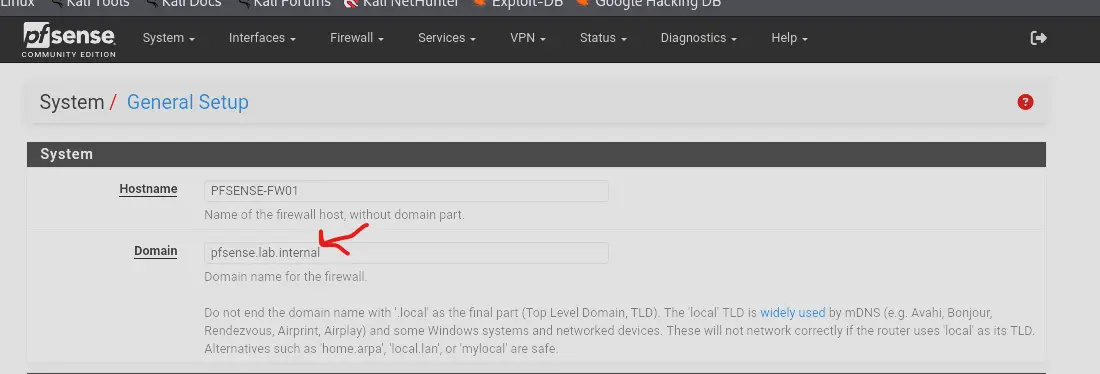
Before adding PFSENSE-FW01 as a DNS forwarder, its domain name should be updated from the placeholder set during initial setup to a name consistent with the lab.internal namespace. This is also required for adding a reverse lookup PTR record for this device in DC01’s DNS.
- Navigate to the pfSense web interface at
https://192.168.20.1, using a device connected toLAN_NET. ATTACKER01 is used here for now. - Go to System → General Setup
- Change Domain from
mylab.home.arpatopfsense.lab.internal - Save
Syslog Forwarding to Wazuh
To provide Wazuh with visibility into PFSENSE-FW01 and ingest essential logs — including filterlog firewall events.
Architecture
pfSense’s built-in syslogd forwards logs to syslog-ng on the local loopback. syslog-ng rewrites the hostname and forwards to WAZUH-SIEM01 over TCP.
pfSense syslogd → 127.0.0.1:5140 (loopback, UDP) → syslog-ng → 192.168.20.20:514 (TCP) → Wazuh
Wazuh must be configured first to open the listener before pfSense begins forwarding.
Configuring Wazuh to Accept Syslog
Wazuh must be configured to accept incoming syslog on a network port. SSH into WAZUH-SIEM01 or access the device directly, then:
- Switch to a superuser:
sudo su - - Navigate to
/var/ossec/etc - Edit
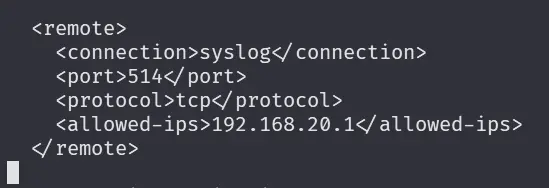
ossec.confand add the following<remote>block:
- Save and restart the Wazuh manager:
systemctl restart wazuh-manager
This configures Wazuh to accept syslog from PFSENSE-FW01.
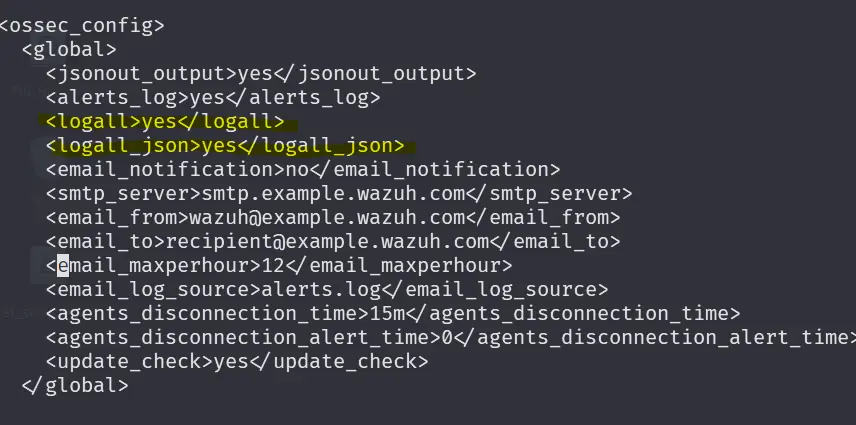
Additionally, enable <logall> and <logall_json> in ossec.conf. This writes all received events to archives.log regardless of whether they match a rule — useful for verifying that logs are arriving at Wazuh at all.
Installing Packages
Install the following packages on PFSENSE-FW01 via System → Package Manager → Available Packages:
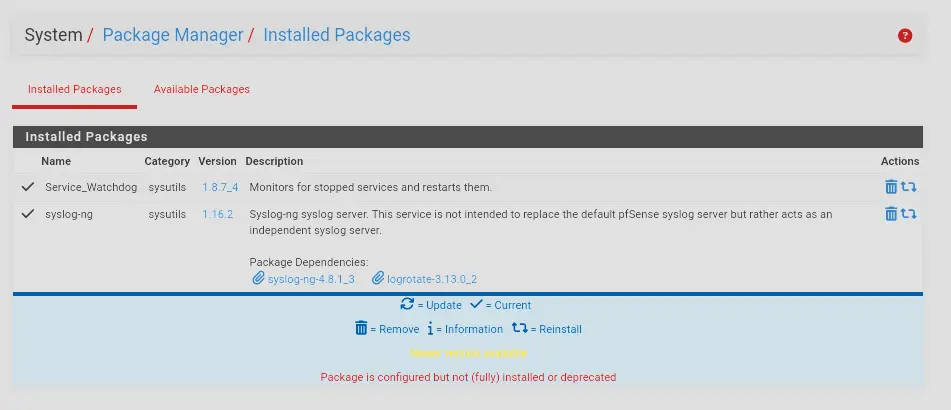
- Watchdog — monitors services and automatically restarts them if they go down. We will add
syslogdandsyslog-ngto its watch list. - syslog-ng — an enhanced syslog daemon that replaces the forwarding role of the built-in syslogd. It supports TCP transport, hostname rewriting, and disk buffering — all of which are critical for reliable log forwarding to WAZUH-SIEM01.
Configuring Watchdog
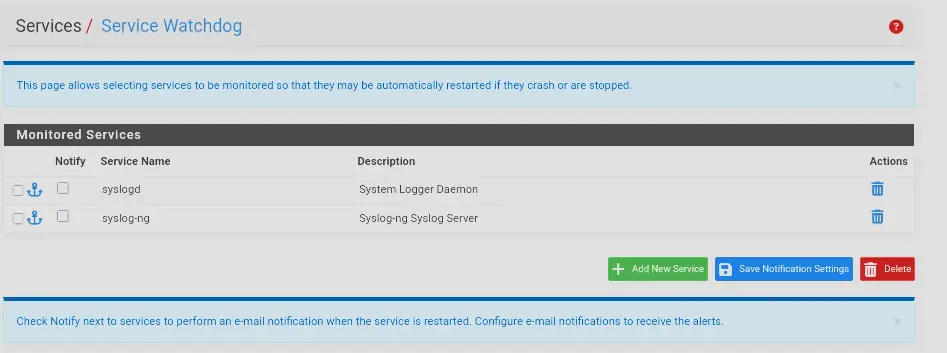
Navigate to Services → Service Watchdog and add two services: syslogd and syslog-ng. Watchdog checks approximately every minute and restarts any service that is no longer running.
Configuring syslogd
Navigate to Status → System Logs → Settings and set the following:
- Log Message Format: BSD (RFC 3164, default)
- Check everything under Logging Preferences
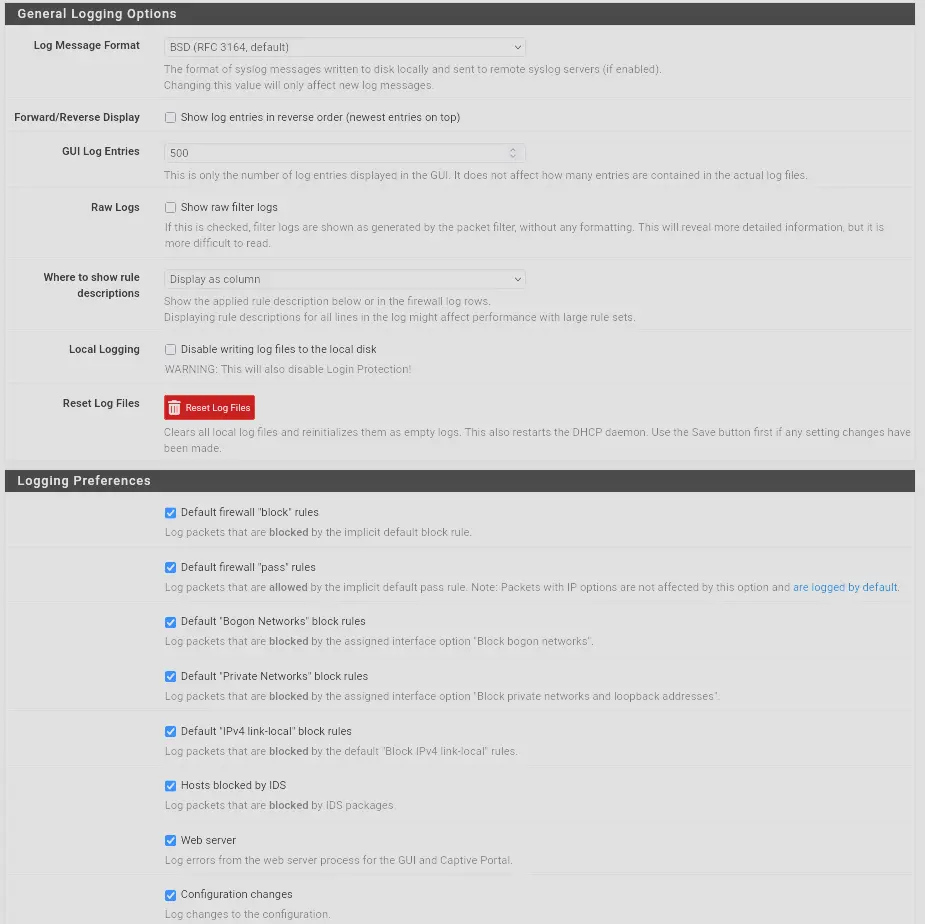
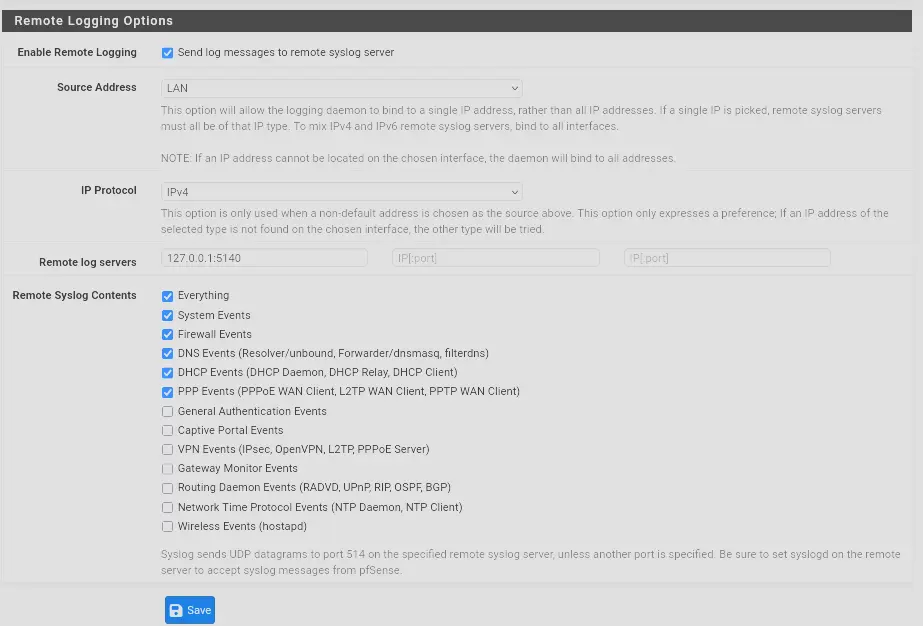
Then under Remote Logging Options:
- Enable remote logging
- Set the remote log server to
127.0.0.1:5140— syslog-ng will be listening on this loopback port - Check the desired entries under Remote Syslog Contents
[!NOTE] There is an option to check everything under Remote Syslog Contents. However, this behaves erratically. If checking everything does not forward all expected log types, manually check each category individually.
syslog-ng
Why Use syslog-ng Alongside syslogd?
The issue with the built-in syslogd is that it forwards syslogs purely over UDP and silently fails after wazuh-manager restarts. The likely cause is ICMP port unreachable.
When wazuh-manager restarts, no service is listening on the UDP port that pfSense is forwarding logs to. PFSENSE-FW01 does not stop sending, so WAZUH-SIEM01 responds to the incoming UDP packets with ICMP port unreachable messages. pfSense’s syslogd interprets this as the destination being dead and stops sending logs entirely. From the outside it just looks like syslogd is silently failing — a frustrating issue since log forwarding should intuitively survive a Wazuh restart.
The only recovery is to restart syslogd or re-save the remote logging config in the pfSense web interface, meaning every wazuh-manager restart requires manual intervention on pfSense to resume log forwarding.
How syslog-ng Fixes This
Instead of syslogd forwarding logs directly to Wazuh, syslog-ng takes over that role. This has several advantages:
- Logs can be rewritten before forwarding — useful for injecting a hostname so Wazuh correctly attributes events to
pfsense.lab.internal - syslog-ng forwards over TCP and automatically retries the connection when Wazuh goes down momentarily
- syslog-ng buffers logs to the filesystem when the destination is unreachable and replays them once it comes back up, so logs are not lost during outages
This allows wazuh-manager to be restarted freely without manual intervention on pfSense.
Configuring syslog-ng
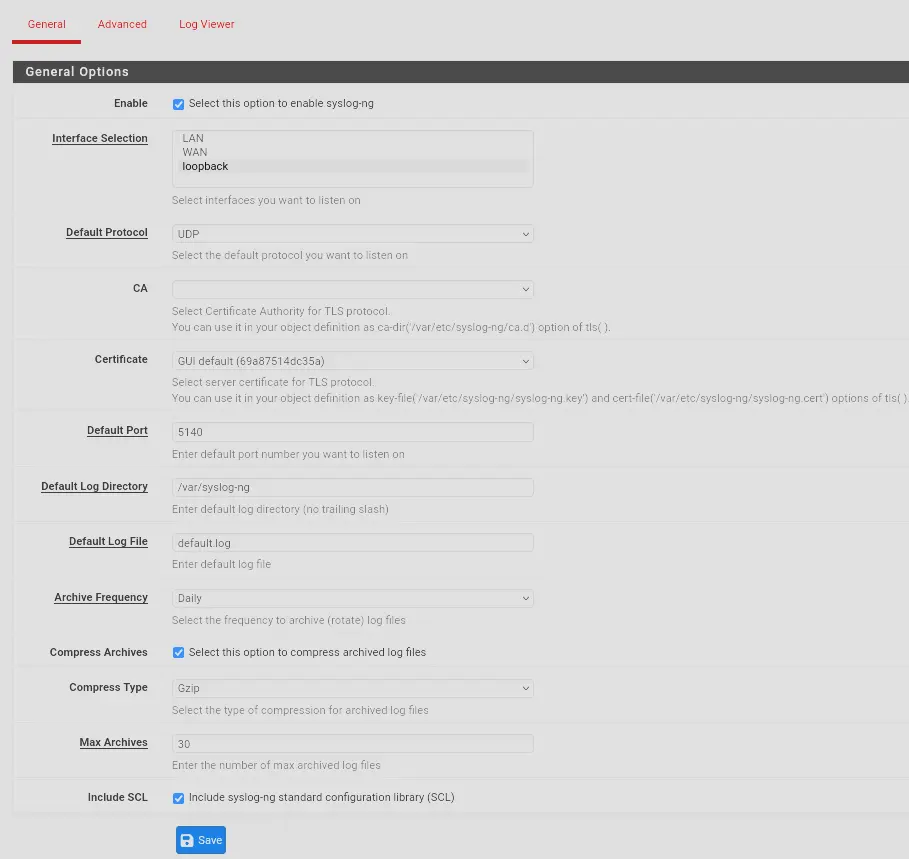
Navigate to Services → syslog-ng → General and set the following:
- Interface selection: Loopback — syslog-ng listens on this interface for logs forwarded by syslogd
- Default protocol: UDP — syslogd only forwards over UDP, so syslog-ng must accept on UDP
- Default port:
5140— must match the destination port set in syslogd’s remote logging config - Include SCL: Checked — SCL (System Configuration Library) is a collection of pre-built syslog-ng config modules that reduces boilerplate, useful when adding additional destinations such as an ELK stack later
Then navigate to Advanced and create the following objects:
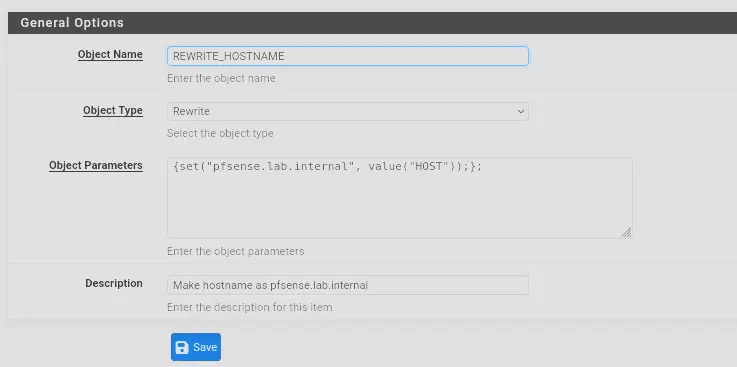
Rewrite object — REWRITE_HOSTNAME
Sets the hostname field to pfsense.lab.internal on all forwarded logs. pfSense’s syslogd omits the hostname from outgoing syslog messages, so this rewrite ensures Wazuh correctly identifies the log source.
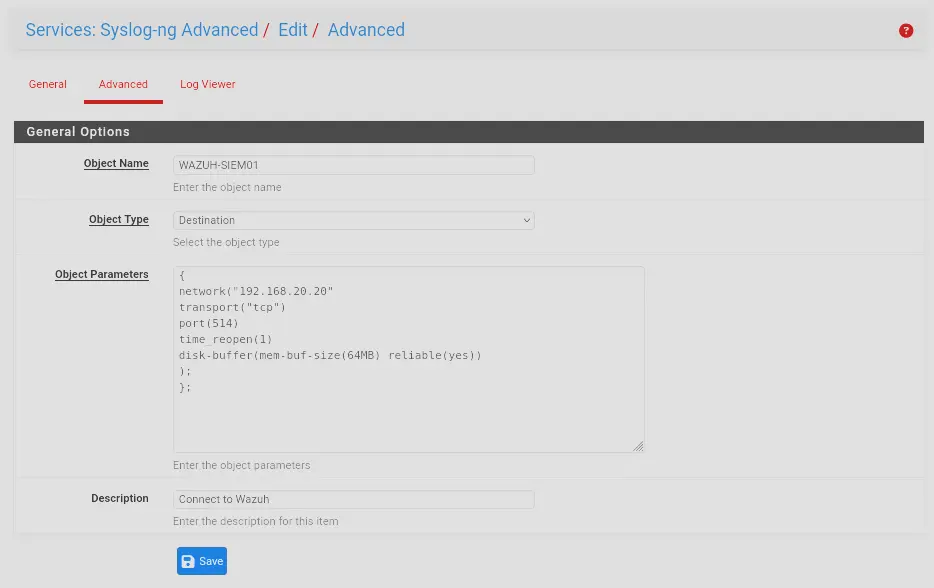
Destination object — WAZUH-SIEM01
Defines the forwarding target. Set transport to tcp and include time_reopen(1) so the connection is retried every second if Wazuh goes down. disk-buffer is enabled so logs are held in a buffer and replayed to Wazuh once it comes back up rather than being dropped. On pfSense, this buffer is written to the RAM-backed filesystem, so it survives syslog-ng crashes but not a full reboot.
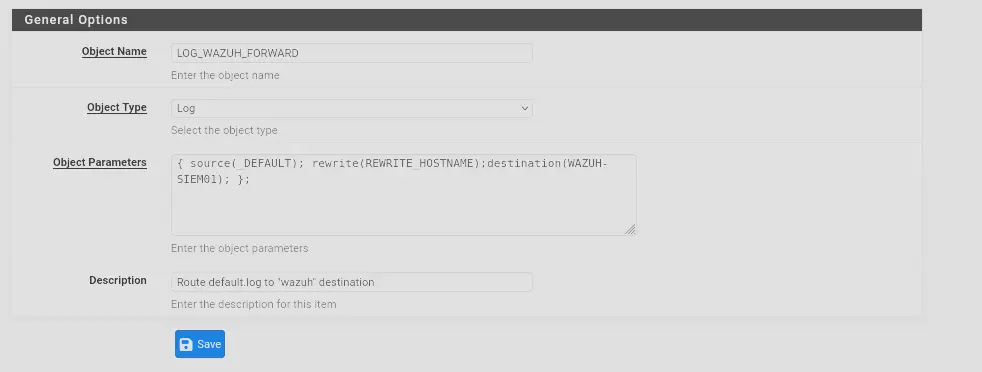
Log object — LOG_WAZUH_FORWARD
Ties everything together. This defines the pipeline: default source → REWRITE_HOSTNAME → WAZUH-SIEM01. All logs received from syslogd have their hostname rewritten and are forwarded to Wazuh over TCP.
Verifying Logs Are Flowing
To verify that Wazuh is receiving pfSense logs, run:
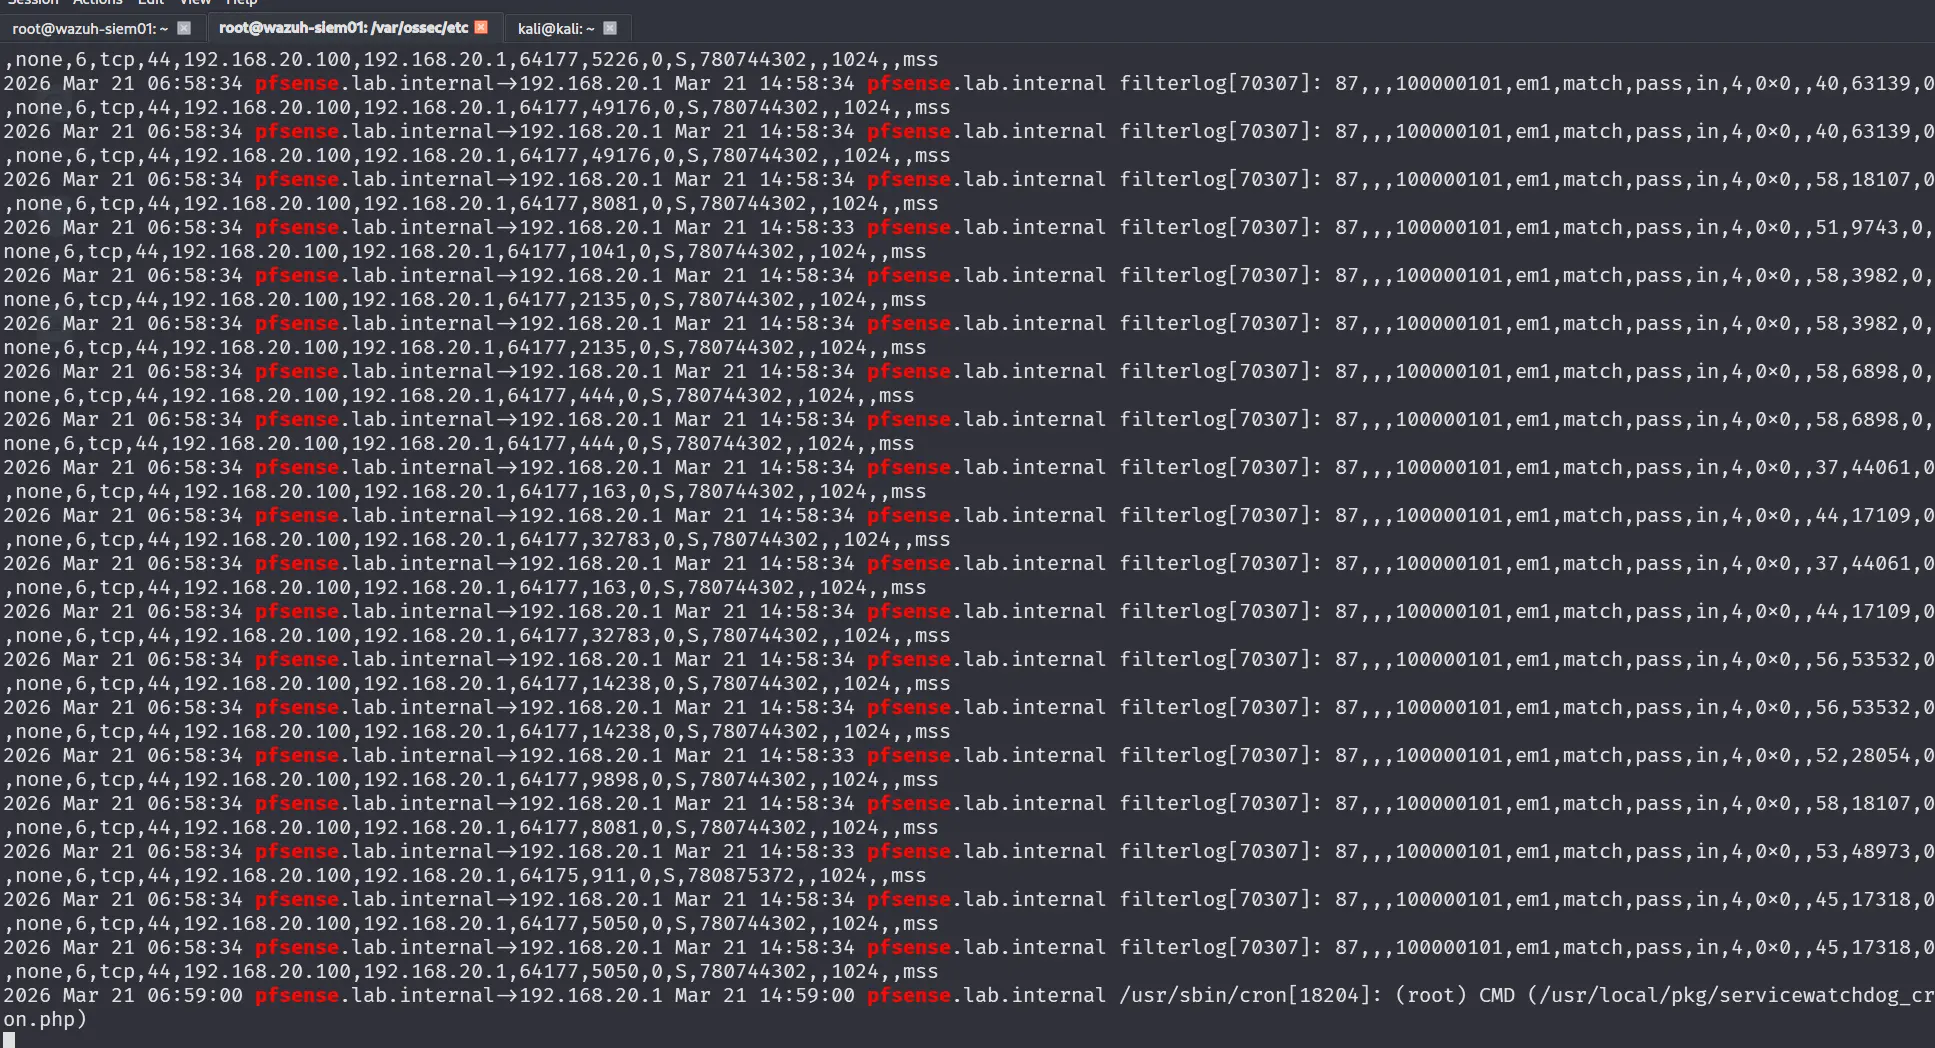
tail -f /var/ossec/logs/archives/archives.log | grep pfsense
pfSense logs should appear as shown below.
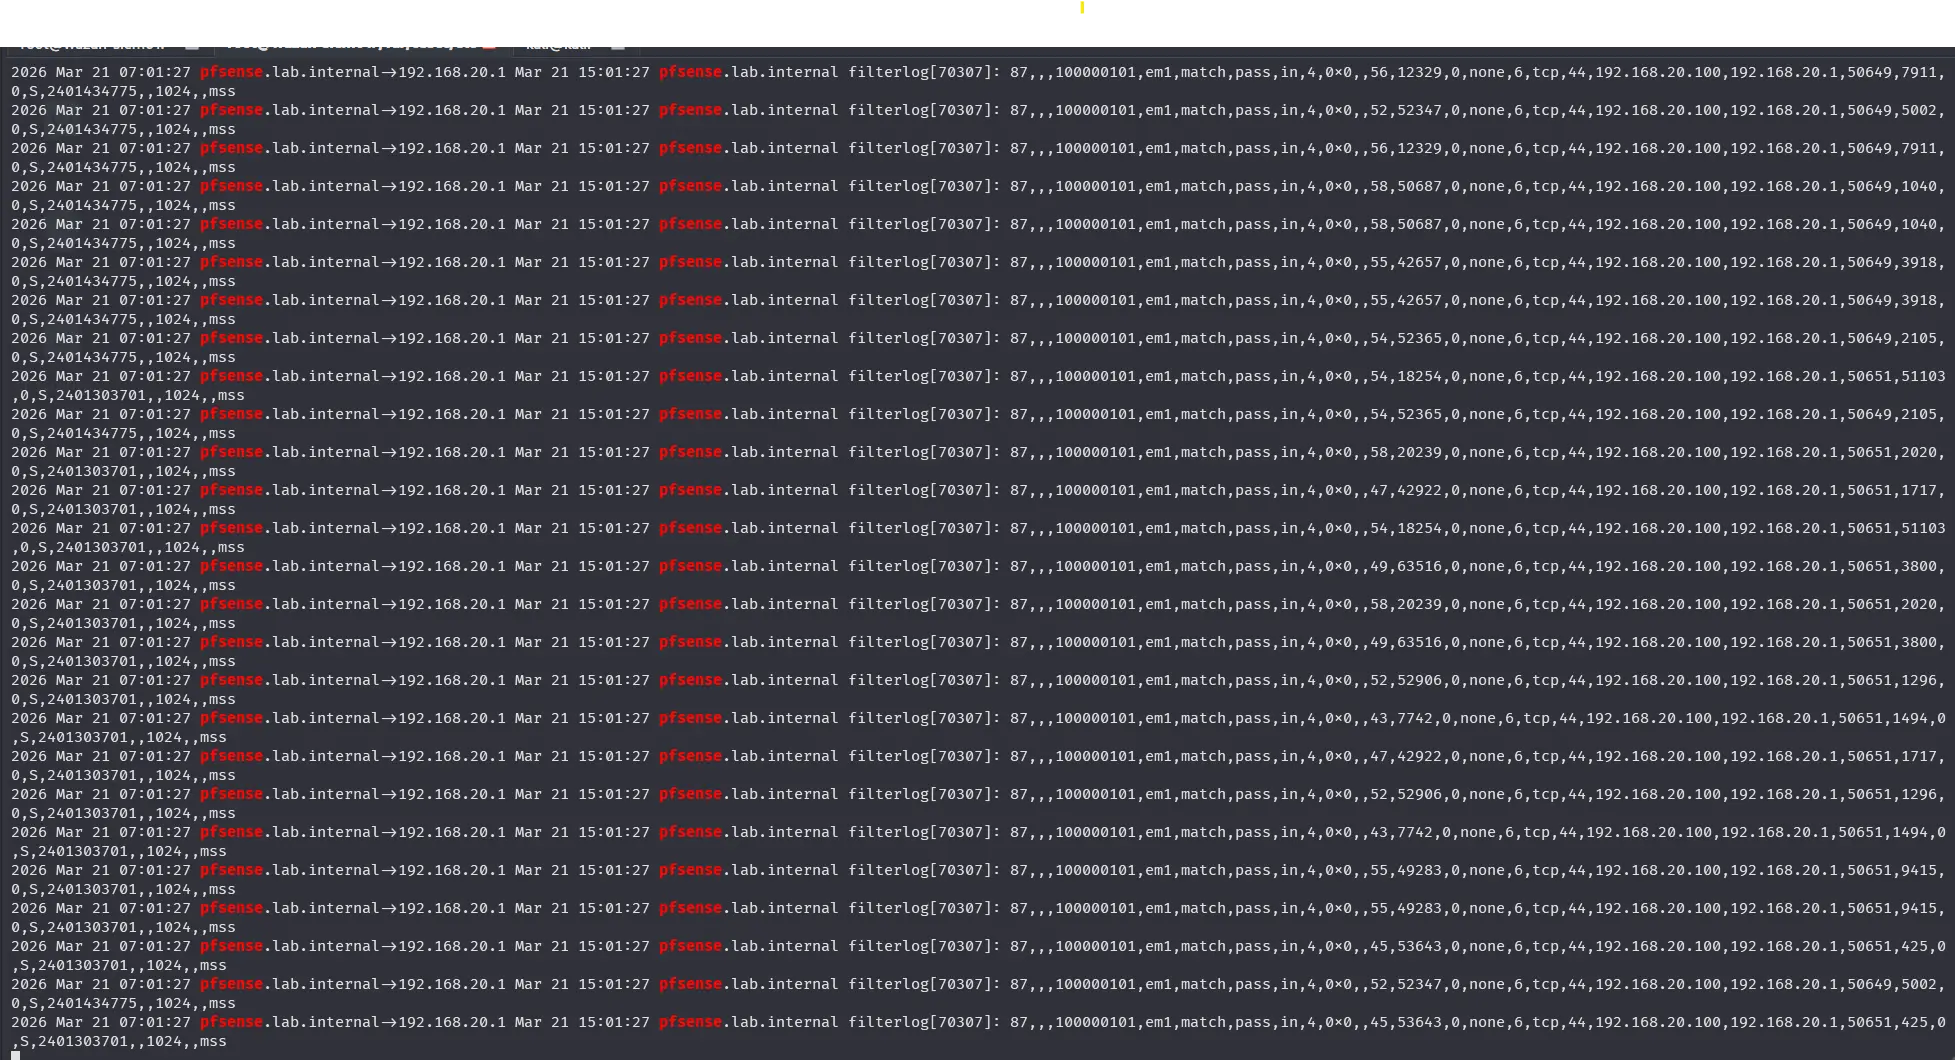
If no logs appear, generate traffic by running an Nmap scan from a machine on LAN_NET targeting PFSENSE-FW01. ATTACKER01 is used here for demonstration:
nmap -sS 192.168.20.1
This produces a burst of traffic from the scanning machine to PFSENSE-FW01, which should trigger firewall rule hits and appear as filterlog entries in Wazuh.
Verifying Log Decoding
Wazuh ships with a built-in decoder for pfSense filterlog entries — no custom decoder is needed. To verify it is working, take a log line from archives.log and pipe it into wazuh-logtest.
[!NOTE] Each entry in
archives.logis prepended with a Wazuh archive header (e.g.2026 Mar 21 07:12:30 pfsense.lab.internal→192.168.20.1). This header must be stripped — only pass the raw syslog line that follows it.
echo "Mar 21 15:12:29 pfsense.lab.internal filterlog[70307]: 82,,,1000002661,em0,match,pass,out,4,0xb8,,64,21719,0,none,17,udp,76,192.168.10.4,172.237.88.124,123,123,56" | /var/ossec/bin/wazuh-logtest
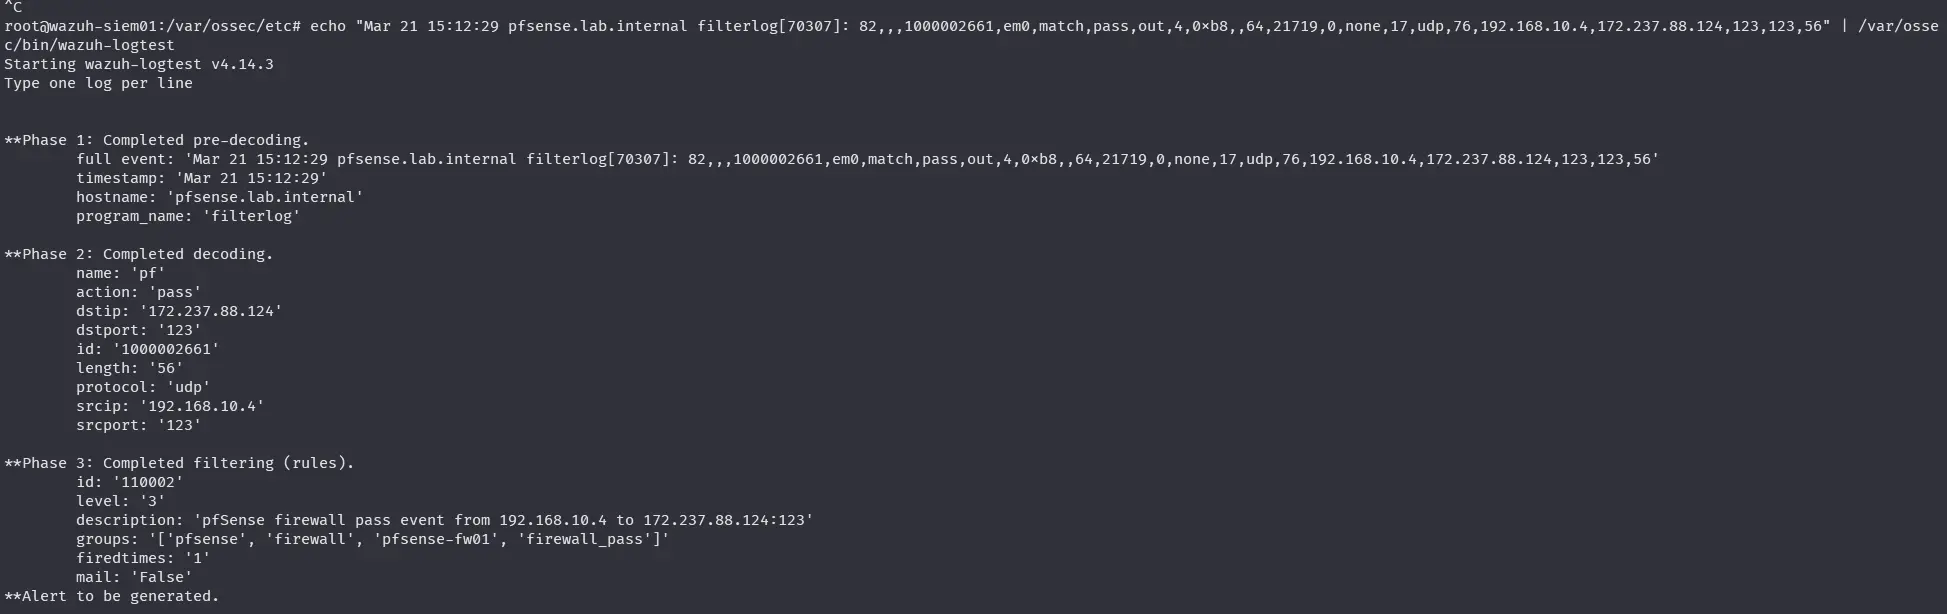
The key phases to check in the output:
- Phase 1 — Pre-decoding: Parses the standard syslog envelope to extract the timestamp, hostname, and program name. Wazuh uses the program name to select the appropriate decoder. Confirm that
filterlogis identified correctly here. - Phase 2 — Decoding: The built-in
pfdecoder fires and extracts field values from thefilterlogpayload. If fields such asaction,srcip,dstip,srcport,dstport, andprotocolare populated correctly, the decoder is working and Wazuh will generate alerts for these logs.