EDGE-RTR01 (Edge Router)
EDGE-RTR01 serves as the boundary device between the WAN_NET and the DMZ_NET. Since devices in the DMZ use private, non-routable IP addresses, this router performs Network Address Translation (NAT) for packets exiting the WAN interface, ensuring external connectivity for DMZ assets.
VM Hardware Configuration
| Feature | Configuration |
|---|---|
| OS | Ubuntu Server 25.10 |
| RAM | 512MB |
| vCPU | 1 Core |
| Disk | 10GB |
| NIC 1 | WAN_NET (NAT Network) |
| NIC 2 | DMZ_NET (Internal Network) |
[!IMPORTANT] To facilitate system updates during initial setup, the network adapters are initially set to NAT mode. Once updates are complete, they are reconfigured to their respective lab segments.
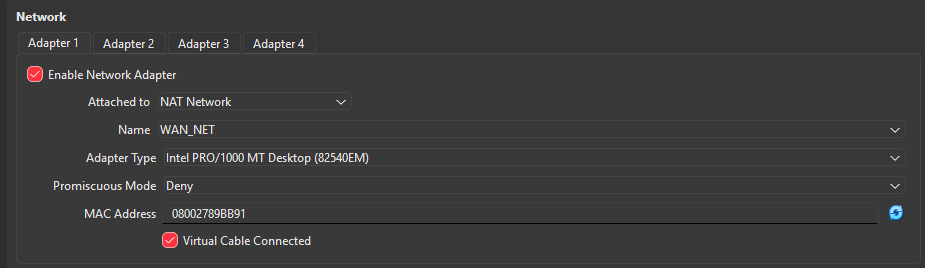
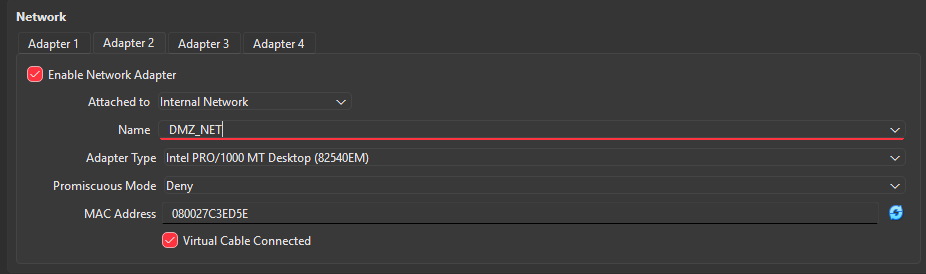
Network Segmentation Approach
This lab utilizes dual NICs for physical segmentation, which is simple and effective for small-scale environments. In larger enterprise deployments, VLANs (802.1Q) are typically preferred for scalability and cost-efficiency. However, due to VirtualBox’s native limitations with VLAN tagging compared to other hypervisors, the multi-NIC approach was chosen for reliability.
OS Installation & Configuration
Installation & Initial Updates
During the Ubuntu Server installation, use the following credentials:
| Field | Value |
|---|---|
| Username | router-vm |
| Password | P@ssw0rd123 |
After the first boot, ensure the VM has internet access (via temporary NAT settings) and run:
sudo apt update && sudo apt upgrade -y
Additionally, install vim (or just use nano):
sudo apt install vim -y
Once updated, power off the VM and revert the VirtualBox NIC settings to their permanent lab segments (WAN_NET and DMZ_NET).
Network Configuration (Netplan)
Identify the interface names assigned by the OS:
ip addr show
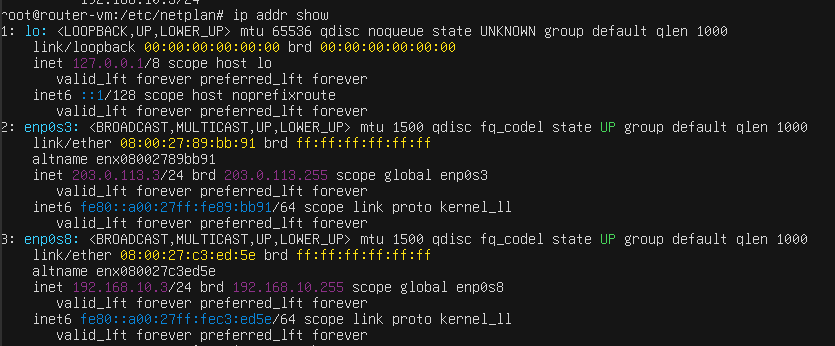
[!NOTE] The screenshot above shows the interfaces after configuration. Use MAC addresses in VirtualBox settings to verify which interface (e.g.,
enp0s3) maps to which network segment.
Creating the Netplan Configuration
Disable the default installer configuration and create a new lab-specific plan:
sudo su -
cd /etc/netplan
mv 00-installer-config.yaml 00-installer-config.yaml.bak
touch 01-EDGE-RTR01-config.yaml
chmod 600 01-EDGE-RTR01-config.yaml
[!NOTE] It is important that the permissions for the netplan yaml file are restrictive e.g set to 600 as root ( read and write for owner only! ) . Otherwise, netplan will outright refuse to use the configuration as the permissions are too open!
Why is this required?
- Security: Netplan files contain sensitive information such as Wi-Fi passwords (Pre-Shared Keys), tunnel secrets, or internal network topology details.
- Best Practice: Since these files define the core networking of the system, only the root user should be able to read and modify them.
Edit 01-EDGE-RTR01-config.yaml with the following settings:
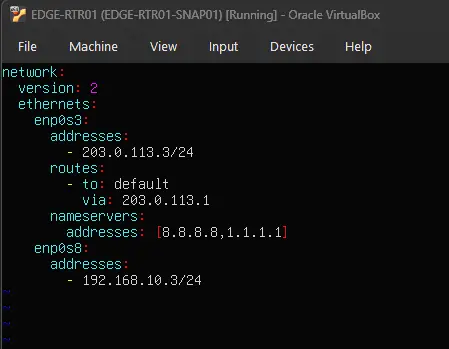
[!NOTE] A very common gotcha in configuring yaml files is the use of
tabcharacter. Only usespace! The standard is 2 space per indentation level.
Configuration Summary:
| Interface | Segment | IP Address | Gateway | DNS Servers |
|---|---|---|---|---|
enp0s3 |
WAN_NET | 203.0.113.3/24 |
203.0.113.1 |
8.8.8.8, 1.1.1.1 |
enp0s8 |
DMZ_NET | 192.168.10.3/24 |
None | None |
Apply the changes:
netplan apply
DNS Services (dnsmasq)
To increase visibility into network activity, DMZ devices forward DNS queries to EDGE-RTR01 rather than resolving them externally.
flowchart LR
    DMZ["DMZ_NET Device"]
    RTR["EDGE-RTR01"]
    EXT["External Upstream DNS"]

    DMZ -->|"DNS query"| RTR
    RTR -->|"DNS query (forwarded)"| EXT

    DMZ -.->|"❌ DNS query (direct)"| EXT
Installation
Install dnsmasq to provide DNS forwarding and caching services:
sudo apt install dnsmasq -y
Resolving Port 53 Conflicts
By default, systemd-resolved listens on port 53, conflicting with dnsmasq.
[!NOTE] What is a DNS Stub Listener? A lightweight service that sits between local applications and upstream servers, caching queries to improve performance.
Identify the conflict:
# ss socket statistics
# -t Show TCP sockets
# -u Show UDP sockets
# -l Show only listening sockets
# -p Show the process using the socket

ss -tulp | grep 53

Fix: Disable the Stub Listener
Edit /etc/systemd/resolved.conf:
[Resolve]
DNSStubListener=no
Update the /etc/resolv.conf symlink to point to the real upstream configuration instead of the local stub:
sudo ln -sf /run/systemd/resolve/resolv.conf /etc/resolv.conf
Restart the service and verify port 53 is free:
sudo systemctl restart systemd-resolved
ss -tulp | grep 53
ping -c 4 google.com
Configuring dnsmasq
Create a clean configuration file:
sudo mv /etc/dnsmasq.conf /etc/dnsmasq.conf.bak
sudo vim /etc/dnsmasq.conf
Add the following directives:
# Security & Performance
domain-needed
bogus-priv
no-resolv

# Upstream Servers
server=8.8.8.8
server=1.1.1.1

# Listening Interface (DMZ only)
interface=enp0s8

# Logging for SIEM/Visibility
log-queries
log-facility=/var/log/dnsmasq.log
[!NOTE]
domain-needed — Never forward plain hostnames (without a dot) to upstream DNS. Prevents leakage of internal hostnames to the outside world.
bogus-priv — Never forward reverse DNS lookups for private IP ranges to upstream DNS. All private IPs are resolved locally.
no-resolv — Ignore
/etc/resolv.confentirely. Upstream servers are defined directly indnsmasq.conf, providing a single source of truth. This also prevents DNS behaviour from changing if something modifies/etc/resolv.conf. On devices like pfSense, multiple services compete to write that file — ignoring it completely provides stability in complex environments.
Restart and verify:
dnsmasq --test
sudo systemctl restart dnsmasq
sudo systemctl status dnsmasq
Routing & NAT (iptables)
Enable IP Forwarding
Enable the kernel’s ability to forward packets between interfaces:
echo "net.ipv4.ip_forward=1" | sudo tee /etc/sysctl.d/99-ip-forward.conf
sudo sysctl -p /etc/sysctl.d/99-ip-forward.conf
[!NOTE]
echo "net.ipv4.ip_forward=1"alone is not enough. This setting must persist through reboots, so we write it to a dedicated conf file instead.
Configure Firewall Rules
Set a default-deny policy and define allowed traffic flows:
# Set default policy
sudo iptables -P FORWARD DROP

# Allow packet fowarding, DMZ -> WAN (New & Established)
sudo iptables -A FORWARD -i enp0s8 -o enp0s3 -s 192.168.10.0/24 \
-m conntrack --ctstate NEW,ESTABLISHED -j ACCEPT

# Allow packet fowarding, WAN -> DMZ (Return Traffic Only)
sudo iptables -A FORWARD -i enp0s3 -o enp0s8 -d 192.168.10.0/24 \
-m conntrack --ctstate ESTABLISHED,RELATED -j ACCEPT
Configure NAT (Masquerading)
Mask the internal DMZ IP addresses with the router’s WAN IP for outbound communication:
sudo iptables -t nat -A POSTROUTING -s 192.168.10.0/24 -o enp0s3 -j MASQUERADE
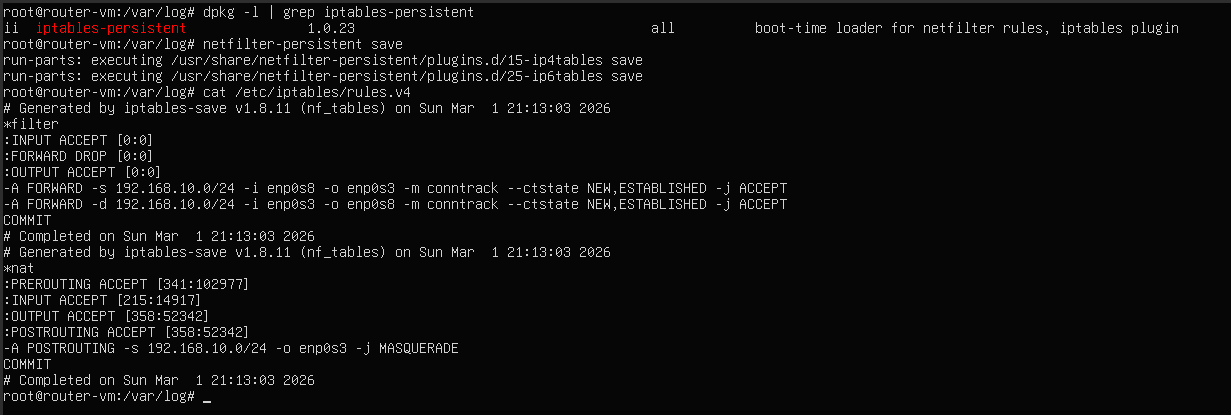
Persistence
Ensure rules persist through reboots:
sudo apt install iptables-persistent -y
sudo netfilter-persistent save
Wazuh Agent & Suricata
To provide security telemetry from the DMZ, EDGE-RTR01 runs both a Wazuh agent (for log forwarding and system monitoring) and Suricata (for network intrusion detection). Since EDGE-RTR01 sits at the boundary of the DMZ, it is the ideal vantage point for IDS inspection of all inbound and outbound DMZ traffic.
Add Route to SIEM Network
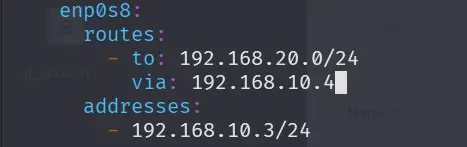
The Wazuh manager resides on a separate network segment (192.168.20.0/24). EDGE-RTR01 needs an explicit static route to reach it via the DMZ gateway (192.168.10.4).
Edit 01-EDGE-RTR01-config.yaml and add a routes block under the enp0s8 interface:
Apply the changes:
netplan apply
[!NOTE] Verify the route is active with
ip route show— you should see192.168.20.0/24 via 192.168.10.4 dev enp0s8.
Install Wazuh Agent
Install and register the Wazuh agent with the Wazuh manager. Use the manager’s IP address (192.168.20.20) rather than a hostname — EDGE-RTR01 does not resolve internal names since its DNS configuration forwards queries externally only.
Ensure the following during setup:
| Setting | Value |
|---|---|
| Manager IP | 192.168.20.20 |
| Agent Group | linux-baseline |
[!NOTE] Port 1515 is used for agent enrollment. Port 1514 is used for ongoing event forwarding to the manager. Both must be reachable from
192.168.10.3.
[!IMPORTANT] Firewall rules permitting traffic from
192.168.10.3to192.168.20.20on ports 1514 and 1515 must be configured on pfSense.
Install & Configure Suricata
Installation & Rule Updates
sudo apt install suricata -y
sudo suricata-update
[!NOTE]
suricata-updatedownloads and merges the latest Emerging Threats Open ruleset (and any other configured providers). Run it periodically to keep detection signatures current.
Interface Configuration
Configure Suricata to monitor enp0s8 (the DMZ-facing interface), which carries all inbound and outbound DMZ traffic. In /etc/suricata/suricata.yaml, set the af-packet interface:
[!NOTE] Promiscuous mode is not required on
enp0s8. Unlike a passive tap listening on a switch SPAN port, EDGE-RTR01 is the actual router — every packet entering or leaving DMZ_NET is routed through this interface by design, soaf-packetalready has full visibility without needing to capture traffic addressed to other hosts.
af-packet:
  - interface: enp0s8
Restart Suricata to apply:
sudo systemctl restart suricata
sudo systemctl status suricata
[!NOTE]
eve.jsonverbosity can cause Wazuh’sanalysisdto throw a “too many fields” error, silently dropping events. To fix this, a trim of the HTTP/DNS output fields insuricata.yamland an increase of the analysisd field limit on WAZUH-SIEM01 are both required. See SURICATA-BR01 for the fix.
Configure Wazuh Agent Groups
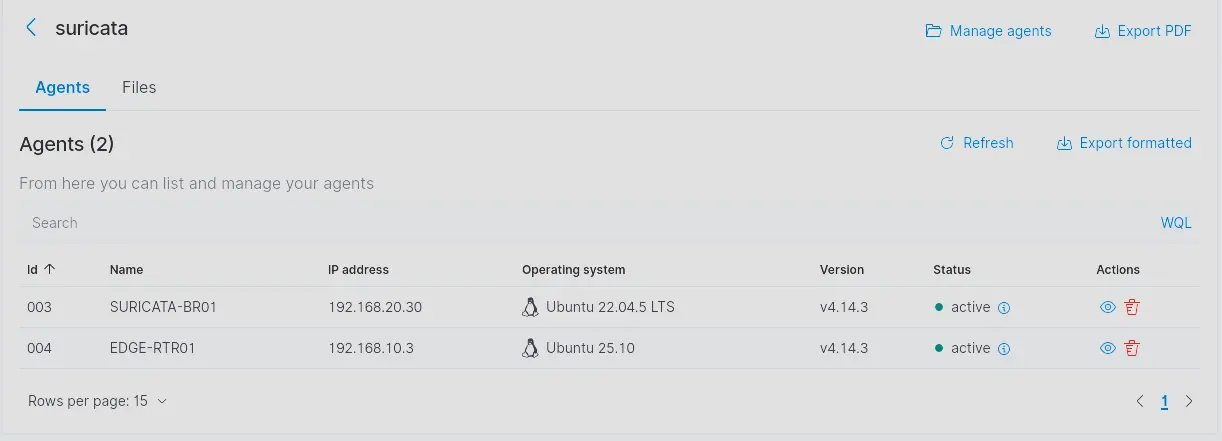
Add Agent to the Suricata Group
In the Wazuh manager, assign EDGE-RTR01’s agent to the Suricata agent group. This applies the group’s ossec.conf which includes the localfile entry for ingesting Suricata’s eve.json alerts.
Create the Edge Router Agent Group
Create a dedicated Edge Router agent group in the Wazuh manager and configure it to ingest the dnsmasq query log:
<localfile>
  <log_format>syslog</log_format>
  <location>/var/log/dnsmasq.log</location>
</localfile>
[!NOTE] This gives Wazuh full visibility into every DNS query resolved by EDGE-RTR01, covering all DMZ devices that use it as their DNS forwarder.
Verify Telemetry
Trigger a test NIDS alert using a known test signature and confirm both log sources are being picked up by the Wazuh manager:
curl http://testmynids.org/uid/index.html
Verify in the Wazuh dashboard that:
- Suricata alerts appear under the agent’s security events
- DNS queries from
dnsmasq.logare being ingested