ATTACKER01 (Kali Linux)
ATTACKER01 is the primary threat actor system in this lab environment. It resides in the WAN_NET segment, simulating an external attacker attempting to breach the network perimeter. It is also used for vulnerability scanning and executing various attack scenarios against the DMZ and internal networks.
VM Hardware Configuration
| Feature | Configuration |
|---|---|
| OS | Kali Linux (Latest Image) |
| vCPU | 2 |
| RAM | 2 GB |
| Disk | 20 GB (Pre-allocated) |
| Network | WAN_NET (Static IP: 203.0.113.4/24) |
Installation & Initial Setup
To quickly set up the attacker system, we utilize the official Kali Linux VirtualBox images provided by the Kali team.
[!NOTE] Download Link Official Kali Linux images can be found here.
Network Configuration (WAN_NET)
The WAN_NET segment is configured without DHCP to simulate a controlled public IP space. We must manually assign the static IP, default gateway, and DNS server using the Network Manager CLI (nmcli).
Identify the Connection
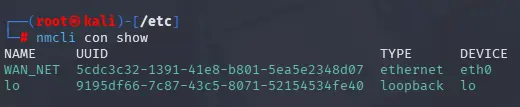
First, verify the connection name bound to the eth0 interface:
nmcli con show

[!NOTE] In this case, the connection name is “WAN_NET”, which is bound to device
eth0.
Assign Static IP & Gateway
Apply the following commands to configure the static network settings:
# Set IPv4 address
nmcli con mod "WAN_NET" ipv4.addresses 203.0.113.4/24

# Set DNS server (Google DNS)
nmcli con mod "WAN_NET" ipv4.dns "8.8.8.8"

# Set Default Gateway (EDGE-RTR01)
nmcli con mod "WAN_NET" ipv4.gateway 203.0.113.1

# Set method to manual (Disable DHCP)
nmcli con mod "WAN_NET" ipv4.method manual

# Apply changes
nmcli con up "WAN_NET"
Once applied, internet connectivity should be established. In nmcli, the connection status should turn green.
Expanding Network Connectivity
While ATTACKER01 is primarily situated in the WAN_NET, it can be pivoted into other segments (like DMZ_NET or LAN_NET) for lateral movement testing and internal scanning.
Phase 1: VirtualBox Hardware Setup
[!TIP] Adding a Secondary Interface
- Power Off the VM.
- Navigate to Settings > Network.
- Enable Adapter 2 (or the next available slot).
- Set “Attached to” to Internal Network.
- Set “Name” to the target segment (e.g.,
DMZ_NETorLAN_NET).
Phase 2: OS Network Configuration
Once the VM is powered on, the configuration approach depends on the target segment’s network services.
Option A: Static Configuration (No DHCP)
Applicable to segments like DMZ_NET where IPs are manually managed.
# 1. Identify the new interface (typically eth1)
ip addr show

# 2. Add the connection profile
nmcli con add type ethernet ifname eth1 con-name "DMZ_NET"

# 3. Configure static addressing & disable DHCP
nmcli con mod "DMZ_NET" ipv4.addresses 192.168.10.5/24
nmcli con mod "DMZ_NET" ipv4.method manual

# 4. Bring the connection up
nmcli con up "DMZ_NET"
Option B: Dynamic Configuration (DHCP)
Applicable to segments like LAN_NET where pfSense provides DHCP services.
[!TIP] Automatic Provisioning In DHCP-enabled segments, Kali Linux will automatically detect the new interface and complete the DORA process to obtain an IP. No manual
nmcliconfiguration is required for basic connectivity.
Optional: Organize Connection Profiles To keep the Network Manager organized, you can rename the auto-generated connection profile:
# Rename the default "Wired connection X" to something descriptive
nmcli con mod "Wired connection 1" connection.id "LAN_NET"
Troubleshooting: No Connection Bound to eth0
If nmcli con show only displays the loopback interface, you must create a new connection from scratch.
Verify Interface Name
Check the available interfaces:
ip addr show
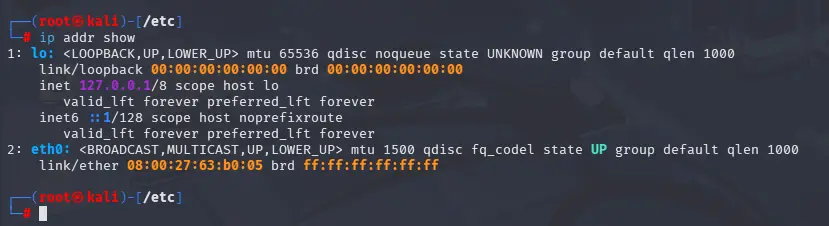
Confirm that the target interface is indeed eth0.
Create the Connection
Manually create and bind the connection to the interface:
nmcli con add type ethernet ifname eth0 con-name "WAN_NET"
After creating the connection, proceed with the Static IP configuration steps above.